The voltage sensor consists of a rotor and a stator. Bolt the octane corrector plate to the sensor-distributor body. 6. Install the distributor sensor cover, check the correct installation of the ignition wires to the spark plugs in accordance with the operating order of the engine cylinders 1–2–4–3, counting counterclockwise. After each ignition installation, check the accuracy of the ignition timing by listening to the engine while the vehicle is moving.
Ignition system on UAZ 469
This mode is used if you start the engine with the starter. Ignitions on UAZ have a simple design. Contactless ignition is more convenient to use than contact ignition.
With an anti-theft locking device, with a lock against restarting the starter without first turning off the ignition and with an illuminated socket. The locking device against reactivation of the starter must not allow the key to be turned again from position I (ignition) to position II (starter).
The operation of a car engine is impossible without correctly set ignition timing. Rotate the distributor body until the middle mark on its body aligns with the mark on the engine. For example, for a VAZ-2106 car, the switch can be installed in the free space between the washer reservoir and the left headlight. Drill 2 holes and screw the switch with self-tapping screws. Correctly setting the ignition timing in a contactless ignition system makes it possible to operate the car in comfortable conditions. Set the crankshaft to a position that corresponds to the ignition timing of 5 degrees. Check the order of connecting the high-voltage wires of the engine cylinders.
UAZ underwater ignition diagram
Or you can go further, throw out the standard harness, the EPH system and install a switch under the hood in place of the variator. The additional resistance terminal “to the starter relay” in some wiring options is connected to additional contacts on the ignition switch, and not to the starter relay. Coil - for contact ignition system! An interesting addition to the ignition system with an ATE-2 distributor and a Hall sensor will be the 962.3734 switch complete with a knock sensor (automatic octane corrector). The knock sensor is connected to the 7th leg of the switch, which is usually not used. The bottom line is that the figure-eight distributor on the figure-eight engine is located “from the ass” of the engine and is driven by the camshaft.
A pair of Hall sensors located at 90 degrees are placed in the distributor. relative to each other. A “butterfly” plate is put on the axis; when it moves in the Hall sensors, it alternately generates pulses. Any distributor will do, the main thing is that it matches the type of drive and is in good working order.
Recommendations for setting up the distributor Is it possible to install a distributor from Volga on a UAZ? Experience in operating a distributor with a Hall sensor (article) How to isolate the distributor from water? Converting contactless ignition to contact I easily converted all the electronic ignition on 31519 with a 3 l engine.1. The standard electronic ignition distributor is replaced with a mechanical one R 119-B;2. The standard ignition coil is replaced with a B-117 A;3. The standard switch and variator are simply removed;4. If the ignition system is contact, then the bearing in the ignition distributor may be worn out or the gap between the contacts may be incorrectly set. Using a crooked starter, you set the distributor slider to the first cylinder, and the middle mark on the KV pulley (ZMZ 402) or the first along the pulley (UMZ engines) opposite the pin. Designed for installation on GAZelle and Volga cars with a ZMZ-4026.10 carburetor engine instead of the standard ignition system.
STEP 4: Connect the wiring and install the switch. We insert the wires into the distributor.

A guide to replacing a distributor with an oil pump drive
Turn off the ignition and remove the distributor cover; the tips and high-voltage cables are connected to it. Then you need to disconnect the wire connected to the switch from the distribution mechanism. Taking a 13mm wrench, unscrew the two nuts securing the device and remove the mechanism along with the oil pump drive from the power unit.
What is the connection diagram for electronic or contactless ignition on a UAZ 417, how to convert contact ignition to contactless? Why does the coil heat up and how to adjust and adjust the advance angle? Also, contactless systems are equipped with an electromagnetic device, which makes it possible to achieve more stable operation of the engine. One of the main nuances in terms of maintenance is the need to periodically lubricate the distributor drive - at least every 10 thousand kilometers. After this, the cover should be removed from the distribution mechanism.
In order for the distributor to fit into the drive, you need to ensure that the protrusions on the coupling at the bottom of the distributor coincide with the slots on the drive shaft. On the installed distributor there should be no gap between the octane corrector plate and the drive housing itself. Remove the cover of the new distributor. To do this, unscrew 2 screws with a Phillips screwdriver. The slider should look at the engine shield. The fact is that the numbering of the 1st cylinder of the ATE-2 distributor does not coincide with the numbering of the standard distributor. It is installed in its standard place without modifications. STEP 4. Connecting the wiring and installing the switch There is nothing complicated. If a kit from a VAZ-21074 is used, then there will be only 3 contacts without pads.
The main components of a contact type system are a battery, a short circuit, a drive, spark plugs, a capacitor, and a breaker with a distributor. A non-contact ignition system called transistor. Unlike the two systems described above, the electronic ignition system is characterized by a complex device that ensures the functionality of not only the torque, but also other parameters.
8000 km. Tighten the nuts of the distributor and fastening the wire contacts. Rotor bushing lubrication. 2. Remove the plastic cover from the springboard and make sure that the runner electrode matches the notch on the cover.
Installing a contactless ignition system based on a Hall sensor allows you to obtain a number of advantages that a contactless ignition system has over a classic (contact) ignition system. This replacement is relevant for early Volga models with the ZMZ 402 engine installed.
Advantages of a contactless system:
The runout and vibration of the slider in the distributor sensor have virtually no effect on the uniformity of spark distribution across the engine cylinders;
The absence of movable breaker contacts in the distribution sensor significantly increases reliability and simplifies the maintenance of the sensor (there is no need to periodically clean the breaker contacts and adjust the gap between them);
Providing the system with increased discharge energy significantly improves the reliability of ignition of the combustible mixture in the engine cylinders, which is especially important in vehicle acceleration modes, when conditions for ignition of the mixture are unfavorable due to temporary depletion of the mixture;
ensuring reliable engine starting at low temperatures, which significantly reduce the voltage in the vehicle’s on-board network (BSZ practically does not cause a change in spark formation parameters even when the voltage drops to 6 V).
The energy of the spark discharge when using BSZ at medium crankshaft rotation speeds is 3...4 times higher than with a classical ignition system, therefore, even significant deposits of carbon deposits on the spark plugs do not significantly impair spark formation in the engine cylinders.
The switch circuit protects the ignition coil from overload, increasing the reliability and service life of the entire system. After stopping the engine, the primary winding of the ignition coil is forcibly turned off, which ensures the safety of the coil when the car is parked for a long time with the ignition on and the engine not running.
Due to the fact that there is no contact group in the distribution sensor, clear and uninterrupted sparking is ensured at high engine speeds, which is not the case in the KSZ.
In a contactless ignition system, instead of a contact ignition distributor, a distributor sensor or hall sensor is installed. A distributor 54.3706-05 is installed on the ZMZ engine. In the distribution sensor, instead of breaker contacts, a magnetically sensitive semiconductor element is used - an electronic microswitch (Hall sensor), the operation of which is based on the physical Hall effect. To take into account the influence of engine operating modes (crankshaft rotation speed and load) on the ignition timing angle, the design of the sensor-distributor includes centrifugal mechanical and vacuum automatic regulators, similar to similar machines of classical ignition systems.
The distribution of high-voltage pulses across the engine cylinders in the distribution sensor is carried out using a rotating slider.
Switching of the primary winding of the ignition coil in the BSZ is carried out by an electronic switch that converts control pulses from the ignition distributor sensor into current pulses in the primary winding of the ignition coil. To increase the sparking energy, the primary winding is made with a low active resistance (0.45 Ohm), due to which the maximum current in the primary winding of the ignition coil before the spark discharge reaches a large value (up to 10 A, instead of 3...5 A for classical coils). ignition systems). Therefore, BSZ coils are not interchangeable with coils of a contact ignition system. Their use in a classic ignition system will lead to immediate burnout of the breaker contacts.
To install BSZ on a ZMZ engine, the following components are required:

1. Sensor - ignition distributor (distributor) - 54.3706-05
2. Ignition coil from VAZ 2108 - 27.3705
3. Ignition switch from VAZ 2108 - 95.3734 (36.3734)
4. Connecting wire harness.
5. High-quality high-voltage wires (optional, but desirable)
6. 2 screws.
7. Distributor gasket.
Installing the BSZ on a car is not difficult and it takes no more than an hour and a half to install. First, carefully dismantle the old ignition system. After unscrewing the nut securing the distributor, disconnecting the low-voltage and high-voltage wires, disconnecting the tube of the UOZ vacuum corrector, remove the distributor. We remove the rubber sealing ring from the old distributor; it will be needed for installation on the new distributor (there is no sealing ring included with the new distributor).
Disconnect the high-voltage wire and the low-voltage wires from the ignition coil. The wires going to contact “K” (except for the wire going to the distributor) and to contact “B” on the ignition coil are subsequently connected to a new coil (if you have a non-variable system, then the coil does not need to be changed). The wire connected to the VC contact is insulated and is no longer used. We remove the ignition coil and put it in storage together with the distributor.
We begin the ignition installation by installing a new distributor. Having put a rubber sealing ring on it, we install it in place of the old one, having previously oriented the distributor drive with its mating part. It will not be possible to install the distributor incorrectly (unless you try too hard), since the groove into which the mate of the distributor is inserted is offset from the center. Having installed the distributor, we connect the vacuum corrector tube and high-voltage wires.
We find a place to install the switch (I installed it on the right mudguard near the GTZ). It is advisable that the installation location be as far as possible from heating parts and splashes entering the engine compartment when the car is moving. We mark the mounting points, drill them and attach the switch to two self-tapping screws. Then we fix the new ignition coil in place of the old one.

Ultimately we get a picture like this.
All that remains is to separate the wiring harness. There are several nuances here that I would like to pay special attention to. In the wiring harness that I purchased, the contacts were poorly crimped and therefore I had to re-crimp them, and later, for greater reliability, solder them (you can buy wiring from a VAZ 2107 in the store). All connectors must be tightly inserted and latched. It is important not to mix up the wires when connecting to the ignition coil. The wiring harness should be connected according to the diagram:
After installing the BSZ kit, you need to set the ignition timing. If all ignition components are in working order and the installation was carried out without errors, the engine starts immediately.
Although progress has stepped far forward, there are still many adherents of the classic VAZ models. Such cars include the old kopeck, which has long been discontinued, and the more modern, but also no longer produced, models 2104 -. In this article we will talk about how contact ignition changes to contactless (electronic) and whether there is really any benefit from such a replacement.
Why is replacement needed?
On the Internet in various automotive forums, owners conduct multi-page debates about the benefits contactless ignition. And these advantages are really enough. After installing contactless ignition, operation becomes smooth and soft. There are no dips when the car accelerates sharply. Starting is significantly easier, especially in cold weather. And of course, noticeable fuel savings.
The device and principle of operation of contactless ignition.
Essentially, the device contactless ignition not much different from the system contact ignition. The only differences are the absence of a distributor and the presence of a pulse sensor with a transistor switch unit.
Installation of a contactless ignition system on a VAZ
First you need to purchase a kit contactless ignition For . We strongly recommend purchasing contactless ignition from trusted retail outlets. It is worth paying attention that the kit must correspond to the characteristics of the engine of your car, and the length of the distributor shaft should not differ from the length of the shaft that is currently installed on the unit.

The contactless ignition kit should include:
- distributor
- coil
- switching unit
- connecting wires
- set of high voltage wires
- four spark plugs marked DVRM
To replace contactless ignition system passed successfully, you need to follow the correct sequence of work. First you need to remove the negative one. Then we disconnect the wires from the ignition coil and the central high-voltage wire, after which we remove the distributor cover. Now we set the slider to the position as shown in the figure so as not to change the ignition settings. You also need to make a mark on the block in order to correctly align the new contactless ignition distributor. Please note that we place the mark in the middle of the five slots on the bottom of the distributor body. Now you can unscrew the nut and remove the old distributor contact ignition system.

Before installing contactless ignition, open the cover of the new distributor and place the slider in the same position as on the old one, perpendicular to the engine. And only then we insert it into the holes of the cylinder block. Then we align the mark that we made previously and tighten the body with a nut.
Then we assemble: put on the cover, connect the high-voltage wires.
Then we disconnect and remove the old ignition coil and put a new one in its place. We connect the other end of the central high-voltage wire to it, but now we won’t need the brown wire that went from the coil to the distributor and can safely put it aside.
We connect all the high-voltage wires in their places. We connect two brown wires to the new ignition coil to contact “K”, and two blue ones to contact “B”.
Now we decide on a place for the switch (possibly in the area of the washer reservoir) and secure it using self-tapping screws. We connect the connector and twist all the wires with electrical tape.
After the completed operations, start the engine and, if necessary, adjust the operation of the contactless ignition.
The contact ignition system is practically not used in modern cars and has given way to contactless and electronic systems. However, our car owners have quite a few old cars (in our case, a VAZ-2106), for which they would like to improve the performance of their engines. As a rule, two options are chosen for this: installing an injection power unit or a modern ignition system.
What is contactless and electronic ignition
You should immediately distinguish between the concepts of “electronic” and “contactless” ignition, since these are fundamentally different systems. The electronic ignition has a crankshaft position sensor and is controlled by it via the ECU (electronic engine control unit). For contactless ignition to work, such difficulties are not necessary.
How does it work? In a non-contact type ignition distributor, instead of opening contacts, an induction coil is installed, which produces a high voltage current, which is then supplied to the spark plugs. And then, as usual, the fuel in the cylinders ignites.
Advantages of using the system on the VAZ 2106
- No open contacts that often burn out.
- No additional adjustments needed.
- Spark plug wear is significantly reduced.
- Fast “cold” engine start in winter.
- Smoother engine operation.
- There is no need to clean or change contacts.
DIY installation and connection diagram
So, having made your choice, we suggest that you familiarize yourself with the necessary tools, the replacement procedure and video instructions.
Tool
From the tool you will need:
- Key 13 - remove and install distributor
- Screwdriver - tighten the screws.
- Drill with a metal drill, diameter for self-tapping screws
- Two self-tapping screws - screw the switch.
- Keys for 10 and 8 - remove and install the coil.
How to install step by step
- Disconnect the negative battery.
Before starting work on the ignition system, disconnect the negative terminal of the battery.
- Remove the cover of the distributor with high-voltage wires.
 Removing the ignition distributor cover
 - Disconnect the high voltage wire at the coil.
 Disconnecting the wire from the ignition coil
 - Using short turns of the starter, set the ignition distributor slider perpendicular to the engine.
 This is how the distributor should be installed relative to the motor
 - Mark the position of the distributor with a marker on the engine.
 Installing the ignition distributor slider
 - Unscrew the nut holding the distributor using a 13mm wrench. Disconnect the wire connecting the device to the coil.
 Before removing the ignition distributor, disconnect the wire that goes to it from the coil
 - Insert the new ignition distributor into the engine by removing the cover.
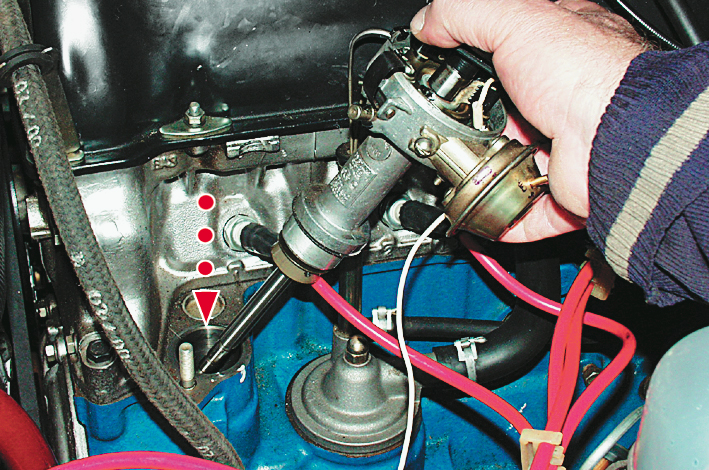 The ignition distributor must be inserted into the standard socket
 - Turn the distributor body so that the middle mark on it coincides with the mark you previously placed on the motor.
- Tighten the nut securing the new ignition distributor.
 The ignition distributor is held in place by a nut
 - Put on the distributor cover and connect the wires to it.
 This is how the cover is installed on the distributor
 - Replace the ignition coil with a new one.
 A new system requires a new coil
 - Connect the original and new wires to the coil. To connect everything correctly, use the diagram.
 All connections must comply with the diagram


