Introductory information
- Content
Daily checks and troubleshooting
Operating and maintenance instructions
Warnings and safety rules when working on a vehicle
Basic tools, measuring instruments and methods of working with them
Gasoline engines
Diesel engines
Power and control system
Cooling system
Lubrication system
Intake and exhaust system
Transmission
Drive shafts
Chassis
Brake system
Steering
Body - Introduction
INTRODUCTION
KIA Venga, whose world premiere took place in 2009, was completely developed in Europe, respectively, for the European market. The 4068 mm long car has an unusually long wheelbase (2615 mm) as well as a height (1600 mm) to increase interior space. KIA compares the interior space of the Venga with the space of C-class cars.
And already at the end of 2010, the ix20 single-box appeared, which technically and structurally differs from the Venga only in the front part.
The Kia Venga features a 60/40 split split seat which can also be folded flat to provide enormous luggage space. Depending on the configuration, buyers can also choose a panoramic glass roof, which will create a feeling of freedom and comfort.
For people from Korea, a wide range of engines is available, represented by two diesel and two petrol units: a 1.4-liter CRDi with a power of 90 hp. s., 1.6-liter CRDi with 128 hp. s., 1.4-liter gasoline engine with a capacity of 90 hp. s., and the 1.6-liter 125 hp. With. These engines can be combined with 5-, 6-speed manual transmissions or 4-speed automatic transmissions.
Thanks to a rational approach, the designers managed to create a car with a spacious interior with wide transformation capabilities. Everything here is simple and convenient, no unnecessary details: an elegant dashboard, a comfortable steering wheel with adjustment for both tilt and reach. There is enough space in the back to comfortably accommodate three people.
The Korean manufacturer did not skimp on the functionality of the basic configuration. Thus, the cheapest version already includes climate control, an MP3 radio with a large information display, a multifunction steering wheel, tire pressure sensors, power windows, electric side windows, airbags and a cooled glove box. The package also includes an anti-lock braking system (ABS) and an electronic stability program (ESP).
Hyundai i20 is a compact hatchback that replaced the popular Hyundai Getz and is the donor platform for the Venga and ix20 compact vans. The car was first introduced in France in 2008.
The differences in the configuration of the hatchback from its one-volume sisters are minimal. So, it is possible to install a 1.25-liter gasoline unit here and there is no version with a full glass roof.
This manual provides instructions for the operation and repair of all modifications of the KIA Venga and Hyundai ix20, produced since 2009 and 2010, respectively.
Due to the structural identity of the units and elements with those in the Kia Venga, this manual can be used when repairing a Hyundai i20, Hyundai ix20 car.KIA Venga/Hyundai ix20 1.4DOHC
Body type: hatchback
Engine capacity: 1396 cm3Doors: 5
Gearbox: auto/mech.Fuel: gasoline
Consumption (city/highway): 7.6/5.0 l/100 km1.6 DOHC
Years of production: from 2009/2010 to present
Body type: hatchback
Engine capacity: 1591 cm3Doors: 5
Gearbox: auto/mech.Fuel: gasoline
Fuel tank capacity: 48 l
Consumption (city/highway): 7.7/5.1 l/100 km1.4 TCI-U2
Years of production: from 2009/2010 to present
Body type: hatchback
Engine capacity: 1396 cm3Doors: 5
Gearbox: auto/mech.Fuel: diesel
Fuel tank capacity: 48 l
Consumption (city/highway): 5.5/3.9 l/100 km1.6TCI-U
Years of production: from 2009/2010 to present
Body type: hatchback
Engine capacity: 1582 cm3Doors: 5
Gearbox: auto/mech.Fuel: diesel
Fuel tank capacity: 48 l
Consumption (city/highway): 5.7/4.0 l/100 km - Emergency procedures
- Exploitation
- Engine
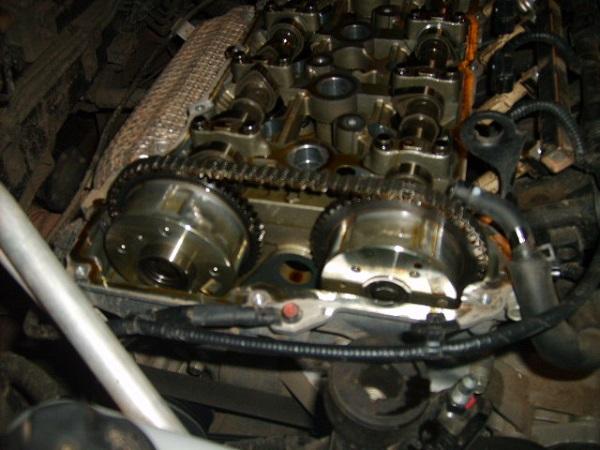
3. Timing mechanism drive
General appearance and design
1. Timing chain 2. Drive chain guide 3. Drive chain lever 4. Automatic drive chain tensioner 5. Drive chain cover 6. Accessory drive belt idler pulley 7. Water pump gasket 8. Water pump 9. Water pump pulley 10. Crankshaft pulley
Removal and installation
Note:Removing the drive chain does not require removing the engine.
1. Remove the engine cover and ignition coil cover.
2. Remove the bolts securing the water pump and the accessory drive belt intermediate pulley.
3. Loosen the alternator drive belt tension adjustment bolt (A), as shown in the figure below.

4. Remove the alternator drive belt (A) as shown in the figure below.

5. Remove the generator assembly (A) as shown in the figure below.

6. Unscrew the mounting bolts and remove the right front wheel.
7. Unscrew the mounting bolts and nuts and remove the support mounting bracket (A) and the ground wire shown in the figure below.

Place a special jack under the engine.
8. Unscrew the mounting bolts and remove the generator bracket (B).
9. Remove the mounting bolts and nuts, then remove the support bracket (A) as shown in the figure.

10. Unscrew the mounting bolts and remove the water pump pulley (A) as shown in the figure.

11. Unscrew the mounting bolts and remove the water pump assembly (A).

12. Loosen the mounting bolt and remove the accessory drive belt idler pulley (A) shown in the figure below.

13. Disconnect the ignition coil connector (A) and the ventilation hose (B) as shown in the figure below.

14. Disconnect the hoses of the positive crankcase ventilation system (A, B), as shown in the figure below.

15. Remove the ignition coils (A) as shown in the figure below.

16. Remove the cylinder head cover bolts (A).

17. Remove the cylinder head cover (A) along with its gasket (B) as shown in the figure below.

18. Remove the engine side cover (A) shown in the illustration below.

19. Rotate the crankshaft pulley clockwise, aligning the notch on the pulley with the mark on the timing chain cover, as shown in the figure below.

20. Remove the mounting bolt (B) and pulley (A) from the crankshaft end.

21. Unscrew the mounting bolts and remove the timing chain cover (A), as shown in the figure.

22. Align the timing marks of the camshaft sprockets with the upper surface of the cylinder head to set the piston of the first cylinder to TDC.
Check that the crankshaft guide pin is pointing upward.
Note:Apply paint marks to the drive chain links where they coincide with the installation marks of the intake and exhaust camshaft sprockets. Also apply a mark to the chain where it coincides with the mark on the crankshaft sprocket.


23. Unscrew the mounting bolts and remove the hydraulic tensioner (A), as shown in the figure below.

Before removing the tensioner, secure the plunger by installing the rod through hole (B) as shown in the figure above.
24. Unscrew the fastening bolts and remove the guide (B) and lever (A) of the drive chain.

25. Remove the timing chain (A) as shown in the figure below.

Installation
1. Align the timing marks on the camshaft sprockets with the upper surface of the cylinder head (the piston of the first cylinder is at TDC during the compression stroke).
Check and ensure that the crankshaft guide pin is pointing upward and 3° away from the vertical axis, as shown in the figure below.

Install new O-rings (A) as shown in the illustration below.

Install the timing chain guide (A). The tightening torque of the fastening bolts is 9.8 - 11.8 Nm.

When installing the drive chain, align the timing marks on the camshaft sprockets with the marks on the chain. The chain installation order is: crankshaft sprocket - chain guide, intake camshaft sprocket - exhaust camshaft sprocket.
2. Install the chain tensioner lever (A). Tightening torque of fastening bolts: 9.8 - 11.8 Nm.

3. Install the hydraulic drive chain tensioner (A), then remove the lock pin (B). Tighten the tensioner mounting bolts with a tightening torque of 9.8 - 11.8 Nm.

Check the location of the timing marks of the camshafts and crankshaft.
4. Install the timing chain cover.
Before installation, remove any remaining sealant from the contact surfaces of the cover and the cylinder block.
Apply a special sealant (THREE BOND 1282B) to the contact surface of the drive chain cover and the water pump housing with the cylinder block; apply THREE BOND 1217H sealant to the remaining surfaces. Sealant bead thickness: 3.5 - 4.5 mm.
Apply sealant (1217H) to the surface between the cylinder head and the block, then install the timing chain cover. Install the cover within 3-5 minutes after applying the sealant.

Align the locating pin on the cylinder block with the oil pump hole. Tighten the drive chain cover mounting bolts with a tightening torque of 18.6 - 23.5 Nm (12 mm bolts) and 9.8 - 11.8 Nm (10 mm bolts).
Note:After installing the cover, do not start the engine for at least an hour.
5. Using the special tool (09455-21200), replace the sealing lip in the cover (A) as shown in the figure.

6. Install the crankshaft pulley. Tighten the fastening bolt with a tightening torque of 127.5 - 137.3 Nm.
Note:When installing the crankshaft pulley, it is necessary to remove the starter and install a special clamp (09231-2B100), as shown in the figure.

When installing the crankshaft pulley, it is necessary that the recess is on the outer side.

7. Install the side cover. Tighten the fastening bolts with a tightening torque of 8.8 - 10.8N-M.
8. Install the right front wheel.
9. Before installing the cylinder head cover, it is necessary to remove oil, dirt and sealant residues from the surface of the cylinder head and timing chain cover.
10. Apply a special sealant (THREE BOND 1217H) to the contact surface of the block head with the cover. Sealant bead thickness: 2.0 - 2.5 mm.

The operational reliability of each vehicle directly depends on the condition it is in. A car will never fail on the road if it is regularly inspected and consumables are changed on time. You can change some parts of the car yourself, but to do this you need to have at least a basic understanding of its structure. Here we will talk about how you can change the timing drive on a Kia Rio 1.6 yourself.
The gas distribution unit serves to remove exhaust gases and to allow air to enter the cylinders. The air mass enters the cylinders due to the cyclic opening and closing of the valve system. This is possible thanks to the operation of the shafts that are connected by the drive. Some Kia Rio models use a chain as a drive, while others use a belt. Let's take a closer look at this.
Chain resourceOf course, the chain is more durable, since it is made of hard metal, and the belt is made of, albeit high-quality, but still rubber. Metal, by definition, lasts longer. The tension of the chain drive is provided by a hydraulic tensioner. This mechanism is automatically lubricated with oil, as it is located inside the motor system. The chain can be used up to 300,000 km, but over time it can stretch, so it is highly recommended to have it diagnosed at least after 40,000 km. If there is play between the links, the chain stretches. This can lead to consumables coming off the sprockets, and then serious repairs cannot be avoided.
The belt is made of rubber alloy, and has serious wear resistance. The belt is no longer built into the engine, but is located outside it. The tension of the belt drive occurs on the gears, which are protected by a plastic cover. The belt has to be changed more often than the chain; this should be done after 150-170,000 km. But the need to replace it may arise much earlier. This is influenced by a number of factors, the main one of which is driving under increased loads. If you use a trailer, then you should check the condition of the belt drive more often, as its use greatly wears out the belt. But increased loads are not the only factor influencing premature wear. Aggressive driving is also important. In this case, the belt also wears out faster. In this aspect, extreme weather conditions can also be mentioned. In severe frost, the belt freezes, and while driving it has to experience strong friction, this also affects wear. Finally, engine oil can get on the belt. This happens when the seal loses its tightness and begins to leak. In this case, it will also need to be replaced along with the belt drive. If this is not done, engine oil will continue to drip onto the new consumable. This will definitely hurt him, as the oil corrodes the rubber.
But what external signs will indicate that the belt is already worn out enough and needs to be replaced with a new one:
- the outer and inner surfaces look clearly worn out;
- the sides are frayed and individual threads stick out from them;
- the material began to delaminate;
- cracks and bulges are visible on the surface;
- oil stains.
Above we talked about the chain. So, its main advantage is the fact that it never breaks. Unfortunately, the same cannot be said about the belt. If you do not monitor its condition, it can wear out greatly, resulting in its breakage. In this case, the car will receive serious damage, after which serious repairs will be necessary. Judge for yourself, as a result of a broken belt drive, the valves will collide with the pistons and bend. Other parts of the assembly will also be damaged, so it is better not to let it break. It is necessary to check the condition of the belt from time to time and change it if necessary.
You can also replace the belt drive yourself. Every car enthusiast can do this if he follows the instructions. To carry out such repairs, it is necessary to prepare the necessary tools and new consumables. Here's what we might need:
- a set of keys;
- set of heads;
- screwdrivers with different tips;
- pliers;
- jack;
- shaft clamp;
- torque wrench;
- new drive;
- set of seals;
- gasket set;
- new tension roller (if necessary).


13. Before installing a new consumable, check that the mark on the camshaft sprocket aligns with the mark on the cylinder head.
14. You should start tightening the gear from the camshaft gear and then counterclockwise.
15. Let the automatic tensioner work by loosening its fastening bolt.
16. Tighten all the bolts and check the tension of the belt drive. It should be optimal - without sagging or tugging.
17. We check all the marks again and begin to assemble the mechanism in the reverse order.
After replacing the belt drive, you need to check the operation of the engine. Start it up and listen to how it works. If there is extraneous noise, everything will have to be done again.
Replacement videoHigh-quality repairs and diagnostics of cars and commercial vehicles. We work with individuals and organizations. We provide brake system and chassis diagnostics, engine repairs, vehicle maintenance, body services and painting. Our staff includes auto electricians with many years of experience. Motor mechanics specialize in certain brands of cars.
Car service center on Piskarevka - Energetikov Ave., 59.Located next to the metro station "Pl. Lenina". Covers car repairs in the Kalininsky, Vyborgsky and Primorsky districts of St. Petersburg. Performs all work on the chassis, engine, suspension and installation of additional equipment. A new wheel alignment stand for cars and minibuses has been installed. Does not do car painting or body repairs. Convenient access from the metro stations "Ozerki", "Prospekt Prosveshcheniya", "Udelnaya" and "Pionerskaya". There is a cozy cafe in the building. To the Ring Road - 10 minutes.
Car service in Kupchino - st. Dimitrova, house 1Initially, the service only dealt with body repairs and painting. Subsequently, several buildings were built in which new two and four post lifts were installed. Large car wash for cars and commercial vehicles. Separate workshop for diagnostics of diesel and gasoline injectors. Repairs of steering racks, turbines and auto electrics are carried out. Repair of mechanical and automatic transmissions is widely represented. Within walking distance from the metro stations "Zvezdnaya", "Kupchino", "Obukhovo". Suitable for residents of the Frunzensky and Kirovsky districts.
The reliability of its operation depends on the technical condition of the vehicle's parts and components. With regular technical inspection and timely replacement of consumables, the car will not let you down on the road. To replace spare parts yourself, you need to know the internal structure of the machine and the parts that require replacement. The article examines what is installed on a Kia Rio: or a chain, and also provides a comparative analysis of both consumables and a description of replacing the timing belt on a Kia Rio.
[Hide]
Which is better: belt or chain?The gas distribution mechanism on the Kia Rio is designed to supply air to the cylinders and remove exhaust gases. Air is supplied by the opening and closing of the intake and exhaust valves. The entire process is carried out using a camshaft and crankshaft connected by a chain or belt. What are the pros and cons of a strap and chain?
The main advantage of the chain is durability. A chain is more reliable than a belt, since it is made of metal, and metal has a much longer service life than rubber. The chain fits onto the timing sprockets. Constant tension is ensured by a hydraulic tensioner. The mechanism is located inside the engine, so it is constantly lubricated with engine oil.
The service life of the product is on average 150-300 thousand kilometers. But during operation, the chain stretches over time, so every 70 thousand km it is necessary to carry out a timing inspection. If play is detected, the tensioner must be changed, as it may jump over the teeth, which can lead to serious repairs. If play remains after replacing the tensioner, the chain must be replaced.
A belt is a cheaper design, but less reliable than a chain. Although modern timing belts are made of a rubber alloy, which is wear-resistant. The belt drive is similar to the chain drive, but is located outside the engine compartment. The strap is not tensioned on the sprockets, but on the shaft drive pulleys, which are located on the front panel and protected by a plastic casing. Belt replacement is performed approximately twice as often as chains: every 70-150 thousand kilometers.
Thus, we can conclude that the chain is more reliable than the belt. Kia Rio cars of the 1st and 2nd generations have a strap, but the chain is more reliable, so all versions of the 3rd generation have a chain drive.
In what cases is replacement necessary?Although the chain is heavier and the chain mechanism has additional parts, this does not affect the reliability of the mechanism. It is recommended to change the chain on a Kia Rio as it wears out, after about 180 thousand kilometers or after 12 years of operation, it depends on which comes first. Replacement possible during engine overhaul.
The belt has to be changed every 60 thousand km. But the main criterion for replacement is visual inspection. Replacement is carried out if the following defects are detected:
- wear of surfaces, both internal and external;
- frayed side edges;
- peeling of material from the base;
- cracks, tears;
- traces of motor oil.
One of the advantages of the chain is that it will never break. If the belt breaks, the valves may bend and the pistons may be damaged, which will require engine overhaul. Step-by-step instructions for replacement
It is convenient to carry out replacement work on an inspection pit, lift or overpass. The car must be put on the handbrake and the wheels secured to prevent the car from moving.
ToolsFrom tools and materials you need to prepare:
- set of spanners and sockets;
- set of wrenches;
- flat screwdriver;
- engine supports;
- torque wrench;
- jack;
- consumables (belt, tension roller).
 Repair kit for Kia Rio
 You should purchase only original consumables, this will save you from unpleasant surprises due to low-quality parts. If the reason for the replacement is traces of oil, the cause of the stains must be eliminated.
Stages Timing belt without protective cover
 Installation:
After completing the timing belt replacement procedure, you should check the vehicle's performance.
Video “Replacing the timing belt on a Kia Rio 2”This video explains and demonstrates how to change the timing belt on a Kia Rio.
The Kia Sportage 2.0 petrol engine in the second and third generations of the popular crossover in Russia are power units that are completely different in design. The second generation of the Korean car has the G4GC model with a cast iron block and a timing belt (Beta II) with a power of 141 hp. On the third generation of the Kia Sportage, a more sophisticated G4KD engine of the Theta II series appeared with an aluminum block and a timing chain drive with a power of 150 hp. (although in other markets it easily produces 165 hp) Today we’ll talk about both engines of the Kia Sportage.
The two-liter G4GC engine is a gasoline naturally aspirated in-line, 4-cylinder, 16-valve, DOHC, water-cooled and timing belt driven. The location in the engine compartment is longitudinal. The engine has a variable valve timing system on the intake shaft. The power unit has hydraulic compensators, so there is no need to adjust the valve clearance. The engine has a cast iron cylinder block.
The two-liter G4KD engine is a gasoline naturally aspirated in-line, 4-cylinder, 16-valve, DOHC, water-cooled and timing chain drive. The location in the engine compartment is longitudinal. The engine has a CVVT variable valve timing system on both camshafts. Unfortunately, the engine does not have hydraulic compensators, so valve adjustment is required approximately once every 90-100 thousand kilometers. Aluminum cylinder block.
Sportage 2.0 G4GC cylinder head
- The cylinder head design of the second generation Sportage two-liter engine.
1 - Ignition coils with explosive wiring
2 - Cylinder head cover
3 - Camshaft position sensor (CMP)
4 - Front cover
5 - Camshaft bearing cover
6 - Camshafts
7 - Valve pusher
8 - Cylinder head bolt
9 - Cylinder head casting
10 - Sealing gasket
11 - Retainers of the split valve lock
12 - Upper valve spring plate
13 - Outer valve spring
14 - Internal valve spring
15 - Lower valve spring plate
16 - Valve
17 - Oil cap
18 - Valve guide

- Timing belt drive
1 - Crankshaft pulley
2 - Thermostat
3 - Upper timing cover
4 - Lower timing cover
5 - Guide washer
6 - Tensioner roller with spring
7 - Intermediate roller
8 - Timing belt
9 - Camshaft drive gears
10 - Crankshaft gear
Replacing the Kia Sportage 2.0 belt must be carried out strictly according to the regulations. A broken belt will lead to bent valves and costly repairs. In the picture above, the phase change actuator (phase shifter) is not drawn on the intake camshaft pulley, but the second generation Kia Sportage has it, although the first one really didn’t have it.
For a more modern engine with an aluminum block, the timing drive looks like this. See the photo below.

If you look closely at the picture, you will notice that the motor has two circuits. The second small one goes into the sump and rotates the oil pump sprocket.
Kia 2.0 G4GC engine characteristics- Working volume – 1975 cm3
- Number of cylinders – 4
- Number of valves – 16
- Cylinder diameter – 85 mm
- Piston stroke – 83.5 mm
- Timing drive - belt
- Power hp (kW) – 141 (105) at 6000 rpm. per minute
- Torque – 184 Nm at 4500 rpm. per minute
- Maximum speed – 176 km/h
- Fuel type – gasoline AI-92
- Fuel consumption in the city – 10.4 liters
- Fuel consumption in the combined cycle – 8.2 liters
- Fuel consumption on the highway – 6.6 liters
- Working volume – 1998 cm3
- Number of cylinders – 4
- Number of valves – 16
- Cylinder diameter – 86 mm
- Piston stroke – 86 mm
- Timing drive - chain
- Power hp (kW) – 150 (110) at 6200 rpm. per minute
- Torque – 197 Nm at 4600 rpm. per minute
- Maximum speed – 184 km/h
- Acceleration to the first hundred – 10.4 seconds
- Fuel type – gasoline AI-95
- Fuel consumption in the city – 9.8 liters
- Fuel consumption in the combined cycle – 7.5 liters
- Fuel consumption on the highway – 6.1 liters
The two-liter Kia/Hyundai G4KD engine, which is now installed on the Sportage, can be found on quite a large number of models from Kia, Hyundai, Mitsubishi, Chrysler, Jeep and even Dodge. Globalization can't be helped.


