Figure 1. Drawing diagram of a homemade snowmobile
I attached the lugs to the conveyor belt with two 6 mm furniture bolts with a large semicircular head. When making a caterpillar, it is very important to maintain the same distance between the lugs, otherwise they will “run” onto the teeth of the drive sprockets and the caterpillar will begin to slip and slide off the rollers.
Figure 2. Plastic pipe cutting device:
1. wooden block;
2. plastic pipe;
3. metal corner.
To drill holes in the conveyor belt for 6 mm mounting bolts, a jig was made. The holes in the tape were drilled using a wood drill with a special sharpening.
Using such a jig, you can drill 6 holes in the conveyor belt at once to attach three caterpillar lugs.
At the store I purchased four inflatable rubber wheels from a garden cart, two drive sprockets from a Buran snowmobile and two sealed bearings No. 205 for the caterpillar drive shaft.
I asked a turner to make the drive shaft of the caterpillar and supports for the bearings. I made the snowmobile frame myself from 25x25 mm square pipes.
Since the axes of the ski and steering hinges are on the same line and in the same plane, you can use a continuous tie rod without ball ends.
Ski turning bushings are easy to make. I welded 3/4″ female plumbing couplers to the front cross member of the frame. I screwed pipes with external threads into them, to which I welded the bipod of the steering rod and ski racks.
I recommend using skis from the Argomak children's snow scooter. They are lighter and more flexible, but they need to be equipped with corners for attaching to the snowmobile's rotating stand and a metal undercut at the bottom - for better control of the snowmobile when moving on crusty or compacted snow.
The chain tension is adjusted by moving the motor.
Driving a snowmobile is very easy. When you increase engine speed with the throttle handle located on the steering wheel, the automatic centrifugal clutch is activated and the snowmobile begins to move. Since the estimated speed of the snowmobile is low (only about 10-15 km/h) and depends on the density of the snow, the snowmobile is not equipped with brakes. It is enough to reduce the engine speed and the snowmobile stops.
I’ll share a few tips that may be useful when repeating this design.
1. I cut the pipe for the tracks lengthwise using a hand-held circular saw for wood, first on one side, then on the other. This makes it smoother than cutting both walls at once. It is more convenient to process small workpieces. If you immediately cut a long pipe lengthwise, then the plastic will melt and the saw blade will jam.
2. Caterpillars can be made of any width. And each designer has the right to choose what is more convenient for him: to make a wide but short track or a narrow and long one. Just remember that with a large caterpillar the snowmobile will be difficult to control and the engine will be more loaded, and with a small one it may fail in loose deep snow.
3. Some of my photos show that there are plastic “barrels” installed inside the caterpillar. These are guide stops for the slide, which should prevent the caterpillar from sliding off the rollers. But during the operation of the snowmobile, the caterpillar did not slide off the rollers even without slipping, so “barrels” can not be installed, which will reduce the weight of the snowmobile.
4. At the end of winter, I completely disassembled the snowmobile to determine its weight. The weight of its individual nodes turned out to be as follows:
- caterpillar - 9 kg;
- drive shaft assembly - 7 kg;
- two pairs of wheels with axles - 9 kg;
- engine and steering wheel - 25 kg; pair of skis -5 kg;
- frame - 15 kg;
- double seat with posts - 6 kg.
In total, everything together weighs 76 kg.
The weight of some parts can be further reduced. Nevertheless, the weight indicator for a snowmobile with a track of this size is quite satisfactory.
The geometric dimensions of my snowmobile are as follows: snowmobile frame length - 2 m; distance between the axes of support wheels (rollers) - 107 cm; The width of the caterpillar is 47 cm. The pitch of the caterpillar lugs depends on the thickness of the conveyor belt and it must be selected experimentally (I got 93 mm).
I do not provide exact dimensions and drawings of the snowmobile parts, since anyone who plans to repeat the design will be guided by those parts and components that they can purchase or manufacture on their own.
The photo shows the stages of manufacturing a snowmobile according to the above diagrams and drawings:
- Blanks for the lugs of the future caterpillar.
- Special drive sprocket from the Buran snowmobile.
- Homemade track drive shaft with sprockets installed for the chain and track.
- A jig for drilling holes in the conveyor belt.
- Track rollers with axles and mounting brackets to the snowmobile frame.
- The drive shaft of the track is driven from the engine by a chain from the motorcycle.
- Snowmobile frame with drive shaft and track rollers.
- Ski turning control mechanism.
- On this snowmobile I installed plastic skis from Chinese children's sleds. But the plastic from which they were made turned out to be very fragile and by the end of winter one of the skis broke.
- Skis from the Argomak snow scooter with an installed undercut (skate) and mounting angles for installation on a snowmobile.
- Ski turning bushings. It's very simple: no bearings. You only need to apply lubricant to the threads, and a long service life is guaranteed. In addition, by screwing in or out the pipes, you can change the ground clearance of the snowmobile.
- The axle of the front wheels (caterpillar rollers) is fixedly attached to the frame, and the axle of the rear wheels-rollers can be moved by rotating the bolt to regulate the tension of the track.
How to make a snowmobile on tracks: photo for article
Do-it-yourself homemade snowmobile: photo
 1 PC. handmade felt homemade fabric flowers craft feltro...
As soon as winter begins in our country, given the climate, two-wheeled vehicles are put away in the garage until spring. It may be impossible to use a car for transportation due to heavy snow. And here, a snowmobile on tracks, which you can make from a walk-behind tractor with your own hands, comes to the aid of all motorists who want to move along a snowy road.
Not everyone has the opportunity to buy an additional vehicle, but everyone can independently construct a homemade tracked snowmobile from a walk-behind tractor.
Advantages and features of a homemade snowmobile

- The vehicle has a mechanical drive and a tracked walk-behind tractor, when driving which you will not get stuck in snowdrifts.
- Steering is done by the skis and the steering system is located in front so you can control it easily.
- The price when purchasing a particular vehicle is important. Therefore, if you do the math, the cost of making a snowmobile yourself will be five times lower than buying it from the manufacturer. And it will be even cheaper due to the available walk-behind tractor and other parts.
- Reliability – where a person cannot pass and a car cannot pass, the snowmobile will overcome all obstacles with ease.
- If a snowmobile is made by hand, then the designer is very careful in choosing parts. By doing everything yourself, you are responsible for the quality of your design. In addition, by paying great attention to the components of the mechanism, you make the snowmobile all-terrain.
Construction of a homemade motoblock snowmobile
This is a sought-after invention that you can make yourself if you have quality parts. The walk-behind tractor is taken partially (separate parts) or used completely. If you decide to use it not fully assembled, you need to weld a supporting frame with a rear axle, steering fork and wheels onto it. The most difficult stage in this case is the transformation of the working shaft of the walk-behind tractor into a drive gear.
The most practical and universal solution in the manufacture of a self-propelled vehicle would be to use parts from a walk-behind tractor. You only need to remove the steering fork and engine from the finished walk-behind tractor.
The motor can be located at the rear of the structure.
Before you start making your own structure, draw a drawing, collect all the necessary materials, prepare the tools, and you can get started. The design is quite simple and anyone can handle it; technical education and any skills are not required.
If you have not graduated from the Faculty of Engineering and find it difficult to draw up a drawing, use ours.

Drawing of a simple frame for a homemade snowmobile
The drawing shows the frame that you will need when making a snowmobile.
The walk-behind tractor in a homemade caterpillar snowmobile is the main part due to which your vehicle will move.
If everything is done correctly according to the drawing, you will get a snowmobile based on a gooseneck.

Drawing of a snowmobile frame on tracks
Making a snowmobile on caterpillar tracks with your own hands
Before starting work, decide on the tool. We can say with 100% certainty that you will need: various screwdrivers, a hammer, welding, a pipe bender (if you don’t have a ready-made frame).
Before preparing a drawing for making your own snowmobile, familiarize yourself with the standard configuration.
- Frame. Every snowmobile has a frame: the more complex the design, the more reliable and stronger the frame should be. The best option is to take it from an ATV, scooter or motorcycle. If you don’t have such a part, you can weld it yourself from pipes with a diameter of at least 40 mm.
- Seat. The seat on the snowmobile must be durable, since the structure itself is quite low.
Mandatory condition: the seat must be made of waterproof material.
- Engine. When choosing an engine, pay attention to its power. If you want a powerful snowmobile, then the engine should be like this.
- Tank. A container with a volume of 10-15 liters, made of metal, is perfect for a fuel tank.
- Skis. If you don’t have ready-made skis that can be adapted for a snowmobile, you can make them yourself from wood. It is better if it is at least nine-layer plywood.
- Steering wheel. When choosing a steering wheel, think about your comfort. It is best if it is borrowed from a two-wheeled unit.
- Caterpillars. Making the tracks is perhaps the most difficult part of the entire self-propelled vehicle.
- Drive unit. In order for the tracks to rotate, you will need a drive - it is best in this case to use a chain from a motorcycle.
Frame
If you don’t have a ready-made frame, it can be easily welded from a profile pipe and shaped using a pipe bender.
If you can’t make calculations and draw up a drawing yourself, then use the drawing from our website as an example.
Once the frame is assembled, treat it with an anti-corrosion compound and cover it with high-quality paint that will withstand both moisture and frost.
Caterpillars
Everyone who has previously designed a caterpillar walk-behind tractor on their own notes: making tracks is the most difficult process in a homemade project.
The easiest way to construct them is from car tires. This option is the most advantageous - high quality and low budget. The part is manufactured in a closed circle, so a tire rupture cannot occur.

Snowmobile tracks made from tires
Instructions for making caterpillars:
- From a car tire: take the tire and cut off the beads (it’s better to do this with a sharp knife). You need to cut so that the flexible part with the protector remains.

During cold weather, transport on two wheels becomes irrelevant, and sometimes it is impossible to drive through snowy expanses even by car. What to do in a situation where there is no money to buy a vehicle more adapted to the harsh winter?
In this case, you can make a homemade snowmobile. Winter vehicles are most often equipped with a tracked drive and steering skis are installed at the front. The snowmobile has high cross-country ability, light weight (70-80 kg), which allows it to drive both on valuable snow and on hard-packed snow-covered roads. Driving this vehicle is easy and the speed is low. So riding a snowmobile in the countryside in winter is not only convenient, but also safe.
Features of homemade snowmobiles
A huge number of companies sell snowmobiles in the CIS. But their prices are high even for families with decent incomes. If you don’t want to overpay for advertising and are a hardworking and creative person, then try making a homemade snowmobile.
A self-propelled gun made by yourself costs 7-10 times less than the cheapest factory-made models.
The success of making a snowmobile yourself depends on several factors:
- your personal skill;
- your engineering and design thinking;
- availability of parts and assemblies from other snowmobiles, motorcycles and other things.
It should be kept in mind that riding a snowmobile, like riding any vehicle, is associated with increased danger. Despite the fact that homemade devices, as a rule, are not capable of reaching speeds of more than 15 km/h, the quality of parts, welding, and bolting of elements should be approached with the utmost seriousness. The issue of operational safety and reliability of the final unit should be the main one for any person who intends to make a snowmobile with his own hands.
Preparation
Before you start making a snowmobile, you need to calculate the basic parameters of the device. If you are a bit of a design engineer, then it is appropriate to make a drawing of the unit. In principle, all snowmobiles are designed the same and simply. Your task is to make a reliable device modeled after all other variants of this class of vehicle.

What you will need for production:
- Pipe for the frame, for pendants and other frame elements.
It was experimentally found that the optimal pipe diameter is 40 mm. If you are using a profile, then 25 x 25 mm will be enough. Wall thickness – 2 mm. With smaller parameters, the resistance of the device to deformation will be reduced. If they are large, the car will become heavier, which, accordingly, will affect the already not brilliant driving characteristics.
- Wheels with rubber on the axle.
Wheels from ATVs (small models with a wheel diameter of 30-40 cm), some carts, etc. are suitable. A total of 2 axles with 2 wheels on each are required.
- V-belts or conveyor belt.
The main element of the "caterpillars". The optimal thickness is 3 mm. This is enough for stability and wear resistance.
- PVC pipes.
They are used to make lugs - the second element of the “caterpillars”. The optimal diameter is 40 mm with a wall thickness of 5 mm.
- Propulsion system.
As a rule, they use an engine, a carburetor, or a fuel tank from a motorcycle.
- Transmission mechanism.
As a rule, they use sprockets and a chain from a motorcycle, and sprockets from snowmobiles. Drive shaft from any unit, suitable in size.
- Guide skis.
It is optimal to take skis from another snowmobile. Since this element must be as reliable as possible, designed for the load of the unit itself, plus the driver and possible passengers.
- Steering wheel.
As a rule, they use a motorcycle handlebar, respectively, with a gas handle and a cable.
- Platform, seat, body.
In principle, you can do without a platform by attaching the seat(s) and the body (optional) directly to the frame. But sometimes an additional platform is constructed on the frame, for example, from wooden boards, which provide slight shock absorption, allow you to place several seats, and at the same time lightly weight the structure.
- Shock absorbers.
This element adds additional complexity to the design. Therefore, they often do without it, especially if they plan to drive on uncompacted snow. Shock absorption is installed on the front suspension and driver's seat. You can take it from an old snowmobile or motorcycle.
- Small parts.
In addition to those listed above, other standard parts will be required to make a snowmobile: bolts, studs, nuts, hinges.
How to make: instructions
First, the frame is welded. Obviously, the larger the frame, the heavier the device will be and the slower it will move. The optimal frame length is 2 m plus/minus.
The following are sequentially fixed on the frame:
- drive shaft with receiving star;
- power plant with a transmission star and gas tank;
- front wheel axle (fixed fastening to the frame by welding or bolts);
- rear wheel axle (fixed with a movable guide element);
- front suspension with steering structure and guide ski(s);
- seat(s) and body.
Caterpillars are made of drive V-belts or conveyor belts. The optimal track width is from 40 to 50 cm. With a smaller width (40), the snowmobile will be more maneuverable and better controllable. With a higher value (50+), the patency of the device improves.
The function of lugs is performed by PVC pipes of the diameter indicated above, sawn in half lengthwise. They are attached to the rubber base using bolts and nuts. V-belts of insufficient width can be fastened to each other with metal grousers.
In order to be able to adjust the tension of the track, the rear wheel axle is attached using a movable guide element, which allows you to fix the position of the axle in a certain position.
Additional notes:
- The center of gravity should be approximately the center of the structure. Since the power plant is mounted in the front, the driver's seat should be centered over the front axle or slightly offset to the rear.
- The distance between the drive shaft and the power unit should be minimal to minimize losses of energy transmitted to the shaft.
- If you install a shock absorber under the seat, then the front seat support is rigidly mounted on a profile arch, and the rear seat rests on the shock absorber.
- If you are making a snowmobile with a heavy load in mind, then to remove some of the weight from the tracks, it is advisable to install an additional ski in the middle of the base (between two tracks). This ski, 50-70 cm long, is attached directly to the frame. However, this design requires a more accurate preliminary calculation with subsequent leveling of the height of the “leg”, which complicates the manufacture of the snowmobile.
- It is advisable to maintain low pressure in snowmobile tires to avoid rapid wear of parts and high fuel consumption.
The considered version of the snowmobile is the simplest in design. If you have the tools and a welding machine, it can be assembled in the garage without any problems.
In many regions of Russia in winter, the only means of transportation is a snowmobile. However, in times of financial crisis, not everyone can afford to purchase expensive equipment. Why not remember the capabilities of a homemade construction kit with a universal motor installation “UMU”, which will allow you to make a snowmobile with your own hands.
Our snowmobile consists of two parts. The first - driven - rests on runners in the form of skis with a seat for the driver. The second - the leading one - consists of a motor unit "UMU" with a wheel drive. Both parts of the snowmobile are connected by a vertical hinge, which allows them to take different angular positions relative to each other.
The driven part includes a supporting frame with a driver's seat and control levers. It hinges on the runner brackets. The supporting frame is rigidly connected to the rotating stand.
The runners are a pair of wide wooden skis connected in parallel to each other. In the middle part of each ski there are hinge brackets.
The frame design provides mounting points for a removable foot platform equipped with brake pedals.
The snowmobile control levers are connected by a single bushing and secured with screws under the driver's seat.
The lever handles have rubber tips. The right handle is equipped with a cable throttle adjustment mechanism from a production motorcycle.
You will have to make the tie rods yourself. Thin-walled steel tubes with a diameter of 16...18 mm are suitable. At their ends it is necessary to install connecting hinges capable of operating in two angular planes.
The second part of the snowmobile has a drive axle with homemade low-pressure wheels. The best solution is to use pneumatic chambers from cars; when inflated, their outer diameter is approximately 80 mm.
It is best to make the supporting frame (see Fig. 2) of the driven part of the snowmobile from a thin-walled steel pipe with a diameter of 40 mm. It is difficult to bend a pipe of this diameter without a special device, so the rotating post of the frame in its lower part will have to be assembled by welding from two straight pieces. If it is still possible to bend the pipe efficiently without disturbing its cross-section at the point of bending, then we recommend starting with this operation the manufacture of the driven frame.

Rice. 2. Support frame design
1 - rotating stand, 2 - support beam, 3 - bushing of the lever axis, A - dimensions of the central part, B - general view of the supporting frame.
Use a hacksaw to cut the remaining tubular blanks. File the joints with a semicircular file. Place the rotary stand with a bent (or welded) end on a flat horizontal surface (concrete floor) and gas- or electric-weld the mating parts. Make sure that all tacked frame parts are strictly in the same plane. To do this, tap the entire length of the pipe with a hammer. Only after this operation, weld all the parts together.
The next step is making the flanges and linings of the support beam. Weld one of the finished flanges to the end of the support beam, maintaining perpendicularity to the axis of the pipe. Place the two plates on the beam and weld the second flange to the opposite end, keeping the holes in both flanges aligned. To install the support beam on the supporting frame, weld the lining on both sides, as shown in Figure 2.
Make sure that the beam is tacked perpendicular to the plane of the frame.
After this, weld the linings. Make sure that the beam moves freely along its axis and at the same time rotates in the plates. Moving the beam along the axis, select a position so that the distance from the plates to the flanges is the same on both the left and right. Mark this position with risks.
Now, according to Figure 2, adjust the angle of the flange so that the free holes point straight down. Check the position of the marks again and weld the beam pipe to the lining. Make final adjustments and only then weld the seam clean.
A detailed description is not required to install the lever axle bushing. It is much more difficult to install the brackets for the rotary axis; treat this work with the utmost care, because here you need to maintain maximum accuracy in the alignment of the holes with each other, as well as the location of the plane of the centers of these holes with the center of the rotary rack and the axis of the middle section of the frame.
The frame assembly is completed by welding the seat brackets and stiffening gussets.
For a pair of skis (see Fig. 3), you will need to make two identical spacers, two identical brackets with axles, and the actual pair of skis.

Rice. 3. General view of the ski pair

Rice. 4. Control details
1 - left control lever, 2 - control lever mount, 3 - lever bushing, 4 - end parts of the hinge (8 pcs.), 5 - central parts of the hinge (4 pcs.)
As for the spacers, they will have to be cut from pipe sections with a diameter of 22 mm. Weld corners of 3 mm thick sheet steel to them. The brackets will have to be bent from the same steel, and the axles will have to be turned on a lathe.
It is best to make skis yourself from sheets of 3 mm plywood in 9 or 10 layers. The best glue is epoxy resin. Carry out drying on a mandrel using powerful clamps. You can read more about this operation in “Lefty” No. 12, 1997 (article “On the snow, like on asphalt”).
The control levers and rods (see Fig. 4) are simple in design, even though welding and turning work will be required during their manufacture. Pay great attention to the accuracy of the hinge rods. If possible, eliminate all play during assembly.
We will also not describe in detail the manufacture of the platform for the feet, brake pedals and seat - their design is clear from Figure 5.
To connect the driven part of the snowmobile to the driving part, a rotary axle is required. Make it from a piece of steel pipe with a diameter of 22 mm and a length of 140 mm. Weld a square flange of sheet steel at one end and drill a hole at the other end for the end washer stopper. The exact dimensions of the axle, flange and end washer can be found on page 10 in "Lefty" No. 4, 2008 - lower part of the universal handlebar.
By the way, from the same issue of the magazine, use the drive axle design, taking it as a basis in your snowmobile, replacing only the flanges shown in Figure 6.

Rice. 5. Foot platform arrangement
1 - brake pedal, 2 - brake cable, 3 - platform, 4 - platform bracket, 5 - brake lever.

Rice. 6. Wheel flange
For final assembly of the snowmobile, you will have to slightly modify the micromotorcycle footrest bracket (see “Lefty” No. 9 for 2008), which is used to attach the snowmobile’s rotary rods. The modification of the bracket is shown in Figure 7.

Rice. 7. Connection of rotary rods
1 - rotary rod, 2 - hinge, 3 - locking hole M-6 (2 pcs.), 4 - stiffening gusset


For the simplest homemade snowmobile, you will need an old moped, welding and some scrap metal to create a snowmobile frame.

As you can see from the photo, the main alteration is installing a ski instead of the front wheel and making a seat resting on the skis.

It’s better to buy ready-made skis, after all, skis are the basis of a snowmobile, but if that doesn’t work out, you can make them yourself from duralumin. Just learn, duralumin cannot be welded with conventional welding, you need argon. Anyone who claims that duralumin cannot be cooked is wrong. Using argon-arc welding, you can easily weld duralumin without disturbing its integrity.
The motor mount is also redesigned to fit the wider base of the snowmobile. Here you can get by with ordinary metal corners and arc welding.
A drive wheel with lugs is also easy to make yourself. The transmission of rotation from the motor to the wheel is chain. Do not try to make huge lugs; if frozen soil gets under the lug of a homemade snowmobile at the moment of full throttle, there is a high probability that the chain will break.

You can make a muffler yourself. You don’t have to achieve any special noise-reducing qualities; roaring through the taiga with the whine of a homemade snowmobile engine will still not wake up the bear, and other animals will be wary of getting involved with the rumbling miracle.

The moped launcher is being converted to a manual start. All the same, in felt boots it is impossible to start it by pulling the crank with your foot.

A box welded under a seat on a homemade snowmobile is good for storing keys and spare parts. But it’s better to put a bottle of vodka in such a glove compartment of a snowmobile made by yourself. In case you break the chain. It’s difficult in the cold without vodka, but you can live with vodka.

As you can see, making a snowmobile with your own hands in the garage is quite simple. All that remains is to wish good luck to the homemade people who love to ride along the snowy plains of our Motherland on homemade snowmobiles!
How to make a homemade snowmobile with your own hands: diagram, photo and device
 This homemade snowmobile was made in a few weeks with my own hands in my own garage. As we can see, its device is very simple, and will be quite within the capabilities of many home craftsmen.
Several years ago I built a snowmobile for my nine-year-old daughter with a homemade track made from conveyor belts and plastic water pipes as lugs. At first I had doubts about the reliability of such a track and how the plastic parts would behave in the cold. But during two years of winter operation, no breakdowns or severe wear of the pipes occurred. This inspired me to create a light snowmobile for myself with the same homemade track.
In the photo above is a homemade tracked snowmobile - at the top is a single-seater version and at the bottom is a two-seater version.
Understanding full well that the smaller the mass of the snowmobile and the larger the supporting area of the caterpillar, the better its cross-country ability in loose and deep snow, I tried to make the design as light as possible.
The operating principle of the snowmobile is very simple (Fig. 1). There are four wheels installed inside the caterpillar, which, when moving, roll along a conveyor belt on which lugs are attached. And the caterpillar drive from the motor is carried out by a chain through the driven shaft using special drive sprockets. I took them from the Buran snowmobile.
With an engine from a conventional walk-behind tractor with an automatic clutch with a power of only 6 horsepower, you will not accelerate quickly. I planned to ride the snowmobile not on compacted paths, but on loose snow, so I abandoned the soft track suspension and skis to reduce the weight of the snowmobile and simplify the entire design.
Tracks for a homemade snowmobile
First I made the caterpillar. A plastic water pipe with a cross-section of 40 mm was cut into blanks for lugs 470 mm long. Then I sawed each piece lengthwise with a circular saw into two equal parts.
Using the device shown in Fig. 2, I used a wood circular saw to cut plastic pipes for lugs lengthwise.

Figure 1. Drawing diagram of a homemade snowmobile
I attached the lugs to the conveyor belt with two 6 mm furniture bolts with a large semicircular head. When making a caterpillar, it is very important to maintain the same distance between the lugs, otherwise they will “run” onto the teeth of the drive sprockets and the caterpillar will begin to slip and slide off the rollers.

Figure 2. Plastic pipe cutting device:
1. wooden block;
2. plastic pipe;
3. metal corner.
To drill holes in the conveyor belt for 6 mm mounting bolts, a jig was made. The holes in the tape were drilled using a wood drill with a special sharpening.
Using such a jig, you can drill 6 holes in the conveyor belt at once to attach three caterpillar lugs.
At the store I purchased four inflatable rubber wheels from a garden cart, two drive sprockets from a Buran snowmobile and two sealed bearings No. 205 for the caterpillar drive shaft.
I asked a turner to make the drive shaft of the caterpillar and supports for the bearings. I made the snowmobile frame myself from 25x25 mm square pipes.
Since the axes of the ski and steering hinges are on the same line and in the same plane, you can use a continuous tie rod without ball ends.
Ski turning bushings are easy to make. I welded 3/4″ female plumbing couplers to the front cross member of the frame. I screwed pipes with external threads into them, to which I welded the bipod of the steering rod and ski racks.
I recommend using skis from the Argomak children's snow scooter. They are lighter and more flexible, but they need to be equipped with corners for attaching to the snowmobile's rotating stand and a metal undercut at the bottom - for better control of the snowmobile when moving on crusty or compacted snow.
The chain tension is adjusted by moving the motor.
Driving a snowmobile is very easy. When you increase engine speed with the throttle handle located on the steering wheel, the automatic centrifugal clutch is activated and the snowmobile begins to move. Since the estimated speed of the snowmobile is low (only about 10-15 km/h) and depends on the density of the snow, the snowmobile is not equipped with brakes. It is enough to reduce the engine speed and the snowmobile stops.
I’ll share a few tips that may be useful when repeating this design.
1. I cut the pipe for the tracks lengthwise using a hand-held circular saw for wood, first on one side, then on the other. This makes it smoother than cutting both walls at once. It is more convenient to process small workpieces. If you immediately cut a long pipe lengthwise, then the plastic will melt and the saw blade will jam.
2. Caterpillars can be made of any width. And each designer has the right to choose what is more convenient for him: to make a wide but short track or a narrow and long one. Just remember that with a large caterpillar the snowmobile will be difficult to control and the engine will be more loaded, and with a small one it may fail in loose deep snow.
3. Some of my photos show that there are plastic “barrels” installed inside the caterpillar. These are guide stops for the slide, which should prevent the caterpillar from sliding off the rollers. But during the operation of the snowmobile, the caterpillar did not slide off the rollers even without slipping, so “barrels” can not be installed, which will reduce the weight of the snowmobile.
4. At the end of winter, I completely disassembled the snowmobile to determine its weight. The weight of its individual nodes turned out to be as follows:
- caterpillar - 9 kg;
- drive shaft assembly - 7 kg;
- two pairs of wheels with axles - 9 kg;
- engine and steering wheel - 25 kg; pair of skis - 5 kg;
- frame—15 kg;
- double seat with posts - 6 kg.
In total, everything together weighs 76 kg.
The weight of some parts can be further reduced. Nevertheless, the weight indicator for a snowmobile with a track of this size is quite satisfactory.
The geometric dimensions of my snowmobile are as follows: snowmobile frame length - 2 m; the distance between the axes of the support wheels (rollers) is 107 cm; The width of the caterpillar is 47 cm. The pitch of the caterpillar lugs depends on the thickness of the conveyor belt and it must be selected experimentally (I got 93 mm).
I do not provide exact dimensions and drawings of the snowmobile parts, since anyone who plans to repeat the design will be guided by those parts and components that they can purchase or manufacture on their own.
The photo shows the stages of manufacturing a snowmobile according to the above diagrams and drawings:
- Blanks for the lugs of the future caterpillar.
- Special drive sprocket from the Buran snowmobile.
- Homemade track drive shaft with sprockets installed for the chain and track.
- A jig for drilling holes in the conveyor belt.
- Track rollers with axles and mounting brackets to the snowmobile frame.
- The drive shaft of the track is driven from the engine by a chain from the motorcycle.
- Snowmobile frame with drive shaft and track rollers.
- Ski turning control mechanism.
- On this snowmobile I installed plastic skis from Chinese children's sleds. But the plastic from which they were made turned out to be very fragile and by the end of winter one of the skis broke.
- Skis from the Argomak snow scooter with an installed undercut (skate) and mounting angles for installation on a snowmobile.
- Ski turning bushings. It's very simple: no bearings. You only need to apply lubricant to the threads, and a long service life is guaranteed. In addition, by screwing in or out the pipes, you can change the ground clearance of the snowmobile.
- The axle of the front wheels (caterpillar rollers) is fixedly attached to the frame, and the axle of the rear wheels-rollers can be moved by rotating the bolt to regulate the tension of the track.
Fishing enthusiasts sometimes have a problem that is associated with passing through difficult areas of the terrain. It is not always possible to get to the coast by SUV. The solution to this problem is a snowmobile, the movement of which occurs due to the caterpillar. True, not everyone can afford such technology. The fact is that it is not cheap. That is why it is worth thinking about manufacturing.
It can be equipped with different types of engines and transmissions. However, all models are universal transport, with the help of which movement in the snow is carried out. In winter, this technique has a number of advantages:
1. Speed. Most vehicles get stuck in snowdrifts. Snowmobiles cope with these obstacles, passing through problem areas faster.
2. Cost-effective. In terms of fuel consumption, the presented unit is much more profitable than other transportation equipment.
3. Maneuverability. Snowmobiles are small in size, which allows them to move even in a snowy forest. That is why they are often used by hunters in winter.
The manufacture of the device includes several features that should be taken into account to achieve safe and efficient operation.
Caterpillar is the most difficult element in production technology. Together with the engine, it is responsible for the movement of the unit. Before starting work, you need to create a drawing of the future model.
Thanks to it, you can remember the smallest details and the sequence of placement of all important elements. First of all, take a plastic pipe and two strips of conveyor belt. Their number is directly dependent on the length of the caterpillar itself. This element is cut several times along the wall to achieve accuracy in the work being carried out. To connect the tape to the cut pipe, you will need two bolts used in furniture production. It is important to ensure that there is no displacement of more than three millimeters.
Otherwise, the track teeth may not work properly. As a result, the tape will simply slide off. In addition, the choice of motor power depends on the length of the element. Also on tracks, it is necessary to calculate the nominal pressure of the unit on its plane. Only thanks to these calculations can we count on the safe functionality of transport.
Drilling tape
You need to take an ordinary drill to drill the tape. If the drill is rebuilt to work with rubber material, the unit will last much longer. You will also need a tool with which to process wood. It is strictly forbidden to use a drill designed for working with metal. 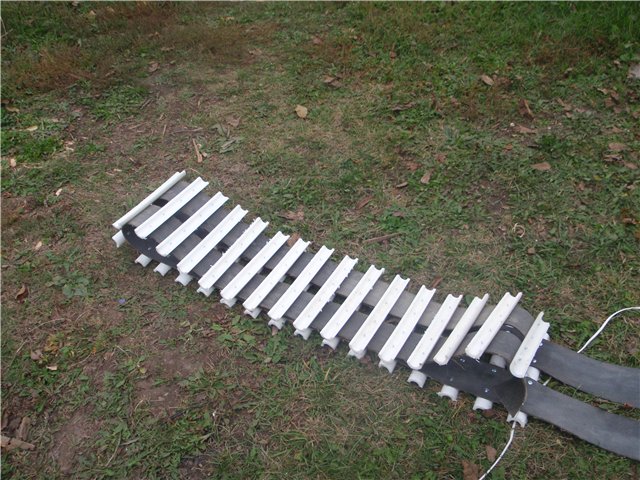
Chassis parts
Many items are easy to buy in specialized stores. These include rubber wheels, assemblies, axles, sprockets, bearings and others. There shouldn't be any difficulties with these details. It is recommended to buy inflatable wheels. Due to this, you can achieve a softer ride on the snowmobile. Then take an ordinary cart used for gardening needs.
The axle is removed from it. If necessary, it can be converted to meet the needs of the equipment. The drive shaft can be purchased at the store or done on a lathe if you have experience working with it. The main thing you need to pay attention to is that it matches the required dimensions. It must accommodate bearings.
Frame
This part is the main load-bearing part, which is capable of holding the remaining structural elements. The frame is made from steel pipe with a square cross-section. It is welded so that there are five beams: three transverse and two longitudinal. Due to this, the structure will become much stronger. 
At the last stage, the prepared parts are assembled into a single mechanism. It is important to carry out this process with special attention, since the correct operation of the snowmobile depends on it. It is necessary to make two rotary bushings that will serve as a steering mechanism. To do this, a water coupling is attached to the front beam using a welding machine.
Its internal thread should be 1/3 inch. The pipes should be screwed in there. They must have external threads and ski struts, as well as bipods, which are necessary for the steering rod. It is required to achieve good maneuverability and control of equipment. Therefore, finished skis are prepared in advance for equipment. The corners of the rotary stand are attached to them, and the metal is cut. Thus, the finished product will be endowed with positive characteristics, distinguished by maneuverability, stability, smooth cornering and high-quality assembly.


