How to modify the design of the dashboard with your own hands? A little time, labor, and you're done! Let's look at how such tuning can be done using an example Hyundai car Accent. Here is a list of what we need for work:
- small pliers;
- sandpaper;
- double sided tape;
- screwdrivers of different sizes;
- Lomond Satin photo paper, matte, 280 g.
- scissors.
Stage 1. Disassembly.
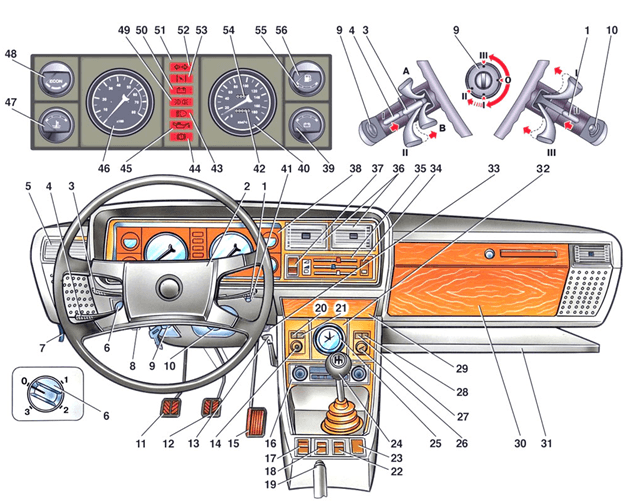
Let's start disassembling the panel. Unscrew the two screws at the top. Then we disconnect the three connectors and now you can sit comfortably at the table and unscrew the devices.

Stage 2. We remove the arrows.
Use 2 screwdrivers and a hair dryer for this.


Make sure that the tachometers are not damaged.

Stage 3. Processing of plastic substrate.
Take sandpaper and sand the backing.

Stage 4 Intermediate.
As a result of your manipulations, the following should appear on the table:
- opaque part of the scale (1);
- old scale (2);
- printouts of the new outside scales (3);
- scale substrate (4);
- tachometer (5);
- arrow.

Stage 5 Printouts.
Carefully cut out the printouts with sharp scissors.

Stage 6. Fastening.
Attach the backing to the scale. We attach the opaque part of the scale with double-sided tape. If the glue does not warp the paper at temperature amplitudes, tol can be used.

Here is the opaque part already glued. It is made using photo paper with a black fill. You can use other opaque and thin material.

Stage 7 Assembly of the structure.
We try on the scale using the gap. The holes are indicated by numbers 1 and 2. This is tape that can be seen through the photo paper. This can be corrected by making a plastic backing.

We fasten everything with standard screws.

Panel assembly. The needles will need to be calibrated on the car.

Stage 8. Calibration
We warm up the car well, fix the cooled liquid temperature arrow in the middle position. We release the throttle - set the tachometer needle to idle speed. Most likely, it is not standing correctly, it may either not move at all or move jerkily. We remove and install it again until it moves as it should! We roll out the gasoline and set the “Fuel Level” arrow to the zero position until the warning light comes on.
First, we string the arrow in the “half tank” position, after which it begins to move, reaching the limiter at the bottom or top. Here it must be removed and quickly put back in place and secured “to zero”. Next, we measure the speed, monitor in which direction and by how much there will be an error, after which we remove the panel and the device itself. We press the internal rotating part, which is at the back of the device, with a screwdriver, and then turn the arrow.
Hit the lenses of spy photographers updated Mercedes-Benz C-Class with a screen instead of the usual dial instrument panel. As a rule, new technologies are first tested on flagship models, and then they are offered for more available cars. So, LCD instrument panels until recently were installed exclusively on very expensive cars. And there is no doubt that this trend in the automotive industry will develop in the future.
Volvo S60


Some manufacturers have begun to place additional digital displays in the center of their watch faces. Later, the “motorcycle” combination with a dial in the center and virtual indicators on the sides, like on the Ferrari FF and Ford Explorer. IN new Volvo The central device has also become liquid crystal - it allows you to change the graphics of the devices. For example, in sport mode the background turns red, and the arrow indication changes to digital.
Lexus LFA


Round device in the center of the shield supercar LFA could move to the right. This freed up space on the left side of the display to display various information. The same technology has been applied to more mass sedan IS with F-Sport package. The tachometer scales and needle are virtual, but the round instrument itself is real and moves along the panel to the whirring of an electric drive.
Tesla Model S


Virtual dashboard Model S is built on the same principle as Volvo panels and Lexus: a round device is located in the center, and on the sides of it you can display almost any information of interest. By design instrument panel Tesla can be called the most unusual.
Mercedes-Benz S-Class


The first car with a fully digital dashboard is considered to be Mercedes-Benz S-Class W221. However, only the speedometer in the center was digital. The quality of the rendering was such that it was difficult to distinguish a real device from a virtual one. Instead of a speedometer, a picture from a night vision camera could be displayed on the same LCD screen.
Range Rover (2010)


In 2009 for Jaguar and Range Rover began offering a fully virtual dashboard. It was a 12.3-inch TFT display. In Range Rover, information about work was displayed on it off-road transmission, wheel angle and suspension articulation. Visteon, the developer of the virtual instrument panel, is currently working on HMEYE technology, which will allow information on the driver's panel to be controlled using the eyes.
Chrysler 200C EV


Chrysler used an unusual solution in the concept electric sedan 200C EV, shown in 2009 - there the tidy smoothly “flowed” to center console. The result was a huge, bizarrely shaped touchscreen through which everything was controlled on-board systems car. The concept had no buttons or levers. WITH passenger side There was another screen through which the climate control could be controlled.
Audi TT


Audi took a different path and in the new TT sports car combined the central information display with dashboard. Now the driver can display the navigation map throughout the entire dashboard - in this case, the dials are significantly reduced in size. The Germans have created a car for the egoist: the front passenger is deprived of the traditional multimedia display in the center.
Marussia B1


Marussia supercar became the first Russian car with completely virtual panel devices. A feature of the B1 and B2 models was the arrangement of three identical displays on the front panel. The one on the far left served as a dashboard. The other two could display navigation maps, a multimedia system menu, and a picture from the rear view camera.
In just a couple of years, automakers will begin to equip even relatively budget models. Concern keeping its nose to the wind Volkswagen Group launched this process a little earlier than others - the “virtual” dashboard has already become the norm even for the mass-market Passat, let alone the more premium Audi A4. Moreover, the new “four” generally became the first among compact sedans the “big German three”, who today offer an alternative to analogue shooters and wells.
If you rely on the figures from the official configurator, then formally the cost Audi options Virtual Cockpit for A4 is only 35,074 rubles. At first glance, this is a very reasonable price for an effective technology that is always visible to the owner’s eye. But there is a nuance here - in order to equip a car with a digital panel, you must order an expensive one multimedia system MMI Navigation plus (188 thousand rubles), the readings of which are partially displayed on the display.
Minimum price
Maximum price
The 12.3-inch digital instrument screen has a resolution of 1440x540 pixels, so the detail is quite high, and the picture on the display is very smooth. In principle, in addition to standard speed/rev data, the “virtual cockpit” displays almost everything that the driver most often deals with - data on-board computer, running media files and much more. The crowning number is navigation Google maps, which are displayed on the instrument panel in full screen mode. Incredibly convenient and spectacular!
This is what he writes about Audi work Virtual Cockpit manufacturer itself:
The driver can switch between two display modes using the multifunction steering wheel. In infotainment mode, the middle part of the display dominates, with the tachometer and speedometer displayed as small circular elements. In the classic presentation, the emphasis is on instruments. Here, the central window with a navigation map or a list of telephones, radio stations or songs occupies a significantly smaller area.
From Audi marketing materials.
The question is how long will a fully digital dashboard last, and whether problems will arise with it during the long-term operation of the car - in hot and cold conditions, on smooth and broken roads Russian roads? Still in modern cars, stuffed digital technologies, it is electronics that most often fool their owners. There is no data yet on the “glitches” and failures of such devices, especially since at first the car was protected by a warranty, and then by the “Kulants” program, but other unpleasant statistics have already accumulated: knowing the high cost of LED devices, car thieves are beginning to take an active interest in them.

Don't believe me? Take a look, for example, at the BMW community forums. BMW owners X5 and 5 Series latest generation They really like to retrofit their cars with digital panels, which are included in the list of options. And demand, as we know, creates supply at the flea market, so owners of the latest generation Audi A4 also have cause for slight concern. AvtoVesti found out from official dealers Audi in Moscow, how much will it cost to buy dashboard for a car produced in 2016. Behind new module Audi Virtual Cockpit officials are asking 291,010 rubles, and for service works for installation and adaptation of the display - another 17,350 rubles. Total - 308,360 rubles!
Spare parts
Installation work
The control devices on the “seven” are concentrated in a single block and are highly informative. For the VAZ 2107 car in addition standard combination electronic panel is produced original look, fully adapted for installation without modification of the torpedo. There are several companies manufacturing products of this kind, and each of them offers its own version.
On a VAZ 2107 model car there is a so-called Europanel control devices can be installed and connected with your own hands without the involvement of specialists. The delivery set includes everything necessary details, to connect the device with the on-board network, standard connectors are mounted on its body. In addition, there is an installation manual and technical certificate, which marks the sale by the store.
Removing the standard instrument cluster
Removing the factory panel from a VAZ 2107 is quite simple; it is installed in a niche on special brackets and secured to them with screws. The procedure for dismantling the equipment is as follows:
- We disconnect battery by disconnecting the negative cable from the corresponding battery terminal.
- Using a flat-head screwdriver, remove the handles from the control levers of the interior ventilation and heating system.
- Reset handle lock nut daily counter Unscrew it with a key and remove it along with the washer.
- We take out the plug for the screw securing the decorative panel and unscrew it.
- With a slight turn, we take the assembly out of the niche and gain access to the instrument cluster.
- By hand, unscrew the union nut securing the speedometer cable to the device and undock it.
- We remove the tube from the econometer fitting and disconnect three electrical connectors.


After this, the decorative panel with the instrument cluster is completely removed from the niche and you can work with it on the table. As can be seen from the description presented, dismantling of this device on a VAZ 2107 car is not particularly difficult and can be done by the car enthusiast independently.
Description of the electronic instrument cluster
In our country there are several manufacturers of this type of equipment that offer their products to consumers. The electronic panel for the VAZ 2107 model car is a set of indicators and units of measuring devices, assembled in a single housing and adapted for installation instead of the factory one. This instrument combination contains the following elements:
- on-board computer with a liquid crystal display measuring 132x48 pixels;
- speedometer;
- tachometer;
- fuel level indicator;
- econometrician;
- turn signal indicators;
- indicator lamps for oil pressure in the lubrication system and battery charge level.
To make it easier for the driver to perceive information, the computerized dashboard for the VAZ 2107 car has a familiar appearance. The speedometer, tachometer and fuel level indicator are designed as dial indicators. This instrument combination has the following functionality:
- diagnostic tester;
- trip computer;
- alarm indicator;
- alarm clock and calendar;
- dynamic parameters indicator;
- storage and display of service book information.

After appropriate settings, this instrument cluster will remind you of the need to perform operations maintenance car. The information content of such a panel on a VAZ 2107 car is very high level, and well-chosen lighting does not distract from driving the car. Instrument cluster It works on the principle of indicating only those parameters that have significant deviations from the specified ones.
Compatibility of the electronic combination with the on-board network
The dashboard described above can be used on VAZ 2107 cars equipped with an injection system different modifications. To connect the wiring harnesses, the developers used standard connectors that match the factory colors, which greatly simplifies the installation and switching of equipment. Geometric dimensions, the shape and location of the mounting brackets are completely identical to the standard panel.

The equipment is adapted to work with blocks electronic control engine of models January 5.1 and BOSCH M1.5.4. It is possible to reprogram the instrument cluster using an encoder with the latter connected through a special connector. The electronic europanel is compatible with parking sensors from the same manufacturer, information from which is displayed on the liquid crystal display.
Installation of this equipment on a vehicle using the included components:
- wiring harness;
- specially shaped connector;
- mounting bolts.
This dashboard was specially developed for the VAZ 2107 car as an electronic version and fits organically into the interior design. Automatic backlight adjustment makes the readings clearly visible and at the same time does not irritate the vision of the driver and passengers.
Installation of electronic combination
The purchased equipment is removed from the packaging and inspected and attached using self-tapping screws to the decorative trim. To those located on back side wire harnesses are connected to the connectors on-board network car VAZ 2107, for convenience they have different shapes and differ in color. The instrument cluster is inserted into the niche and fixed in it with a screw.
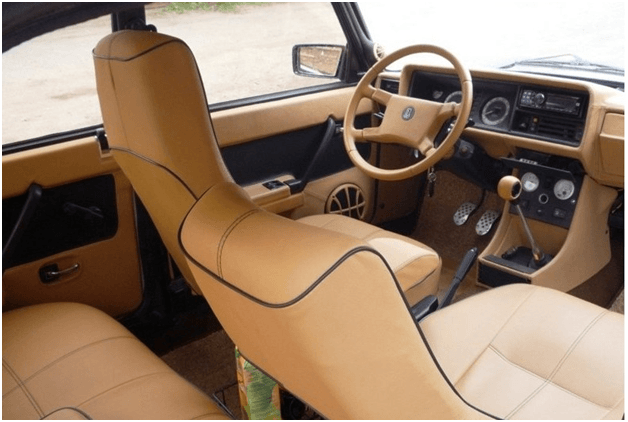
Instrument panel one of important elements interior that the driver pays attention to while driving. Its tuning always catches the eye. Let's talk about the principles and basic ways to improve the panel.
In modern foreign cars there is a whole complex of instruments and sensors, including small displays.
How to tune the instrument panel

I would like to say right away that the boundaries of tuning the instrument panel are limited only by your imagination, the taste and color are up to you to choose. But still, for the most part, we can highlight the replacement of standard lighting, the addition of lighting for sensors, arrows and other components.
In addition to lighting, you can change appearance panels by adding special stickers to the devices. Thus, the appearance of the instrument panel will change. Some car enthusiasts manage to make such stickers themselves by printing them on a laser printer on self-adhesive paper.
The third method and the most expensive is complete replacement instrument panels for a tuned one. Most often, this may be a completely different arrangement of devices, multi-colored lighting, or the presence of additional devices. The most modern is the installation of a large display instead of analog devices, but such pleasure will cost a lot of money.
LED-based instrument lighting

It often happens that the dim factory backlight of the instrument panel confuses the instrument indicators or is not visible at all. Also, due to such illumination, the driver’s eyes get tired, which can lead to an accident.
The most in a modern way counts LED lights based on tapes. Firstly, they are easy to buy at any auto store, and secondly, they are quick and easy to install. The first thing we need is to remove the instrument panel, depending on the make and model of the car, the panel is removed in different ways, so we will not describe the process of unscrewing and removing the panel.
Now, having removed the panel, unscrew it to the base, so that you can easily get to the standard lighting. As a rule, in passenger cars power supply 12V, same power supply and LED Strip Light.
Next, you should be good with a soldering iron; you will need to remove standard light bulbs and solder the LED strip in their place. As a soldering fastener, you can use two small wires, but not very thin ones; they can burn out due to the load.

It is advisable to place the LED strip evenly over the entire surface. As practice shows, it is better to solder several short strips than one long one, and the likelihood of combustion is less, and there will be no load on one power supply.
If you are not comfortable with a soldering iron, then it is better to turn to experienced ones, since here you need to be careful and careful, the slightest short circuit can burn the entire instrument panel.
Once all the strips have been soldered, it’s worth checking, connecting the instrument panel with a surface-mounted installation and turning on the backlight; if everything is done correctly, all the strips will glow. The strips themselves can be attached using double-sided tape, so the backlight will be distributed evenly across all devices. All that remains is to collect everything in reverse order, tighten the instrument panel and enjoy.
Film instead of LEDs

More in a simple way can be considered using film instead of LEDs or LED strip. The advantage of this method is its simplicity and lower costs. Getting started is the same as in the previous case. It is worth unscrewing and removing the instrument panel, then disassembling it to the base where the backlight is located. Now the procedure begins to differ. Usually factory backlight white(in domestic cars), and the color changes thanks to the film on devices with reverse side.
How transparent film, the brighter the instrument illumination will be; depending on the color of the film, the instrument illumination will also be. The principle is designed in such a way that light from a standard backlight passes through the film, thereby changing color and illuminating the devices.

Here, as they say, the colors will be limited by your imagination; you can make numbers of one color, arrows of another, and lines of a third. Some amateurs use sandpaper and a scratch pad to clean the base of the instruments on the back side (from the backlight side) so that the numbers and indicators appear brighter. The film can be used as a special film, also sold in car dealerships, or you can find it yourself from scrap materials. A big plus we can assume that no changes will be made to the electronics, which means there can be no short circuit.
Putting a sticker on the dashboard

In addition to the above mentioned methods for changing the color of the backlight, you can also change the appearance, that is, the image of the instruments as the driver will see them.
For this purpose, special stickers are most often used. To do this, you should disassemble the instrument panel and get to the instrument backing, on which the values and numbers are printed.
It is worth remembering that stickers are sold for each model, make and year of manufacture of the car separately. As an example, it may be the same car, make and model, even year of manufacture, but the instrument panel is different. One will have a tachometer, the other will not. Therefore, stickers should be selected very carefully.
Before gluing, try it superficially on the factory panel to see if it fits the fasteners, or if there is anything that interferes with the smooth application of the sticker. If the old coating can be removed, then it is better to do so; the new sticker will look much prettier. Now that everything is fine, the surface on which you will glue it should be wiped with a degreaser. Glue one side and, while pressing the sticker, slowly pull off the protective layer. It’s important to smooth it out so that there is no air under the sticker, otherwise the temperature will cause it to peel away from the surface in a few months.
After completing the procedures, you can put everything back together and mounted it to see how well the instrument panel has improved. Next, we assemble everything in reverse order, installing the panel in its proper place.
Replacing the instrument panel with a new one

As we previously recalled, in addition to the suggested methods, there is also the most expensive, but also the highest quality option, which is a complete replacement of the instrument panel. Nowadays, instrument panels based on large display instead of analog devices.
Even on domestic cars you can install such a miracle and the panel will acquire modern look. When choosing, it is worth remembering all the parameters of your car, since even different engines may play a role in selection. Such a panel allows you to completely customize the devices to your taste, their location, lighting and other parameters. In a word, do everything to the driver’s taste. Below we have provided a video example of the operation of such an instrument panel on a VAZ 2114 car.
This technology is based on a large display covering the entire instrument panel, a minicomputer based on Android and a set of devices, Wi-Fi, Bluetooth.
Such a replacement is usually short-lived, but expensive, so first you should think about whether you need it or just for beauty.
Instrument panel tuning price

The cost of parts may depend on what you want to get as a result. For example, an LED strip 10-15 cm long will cost about $1-2, but if you take color film, then the costs are generally less or you can even find a similar one at home in the garage.
As for the display instead of the instrument panel, for the same VAZ 2114 it will cost $300-400. But still, again it all depends on the modification installed software and recruitment additional functions such a dashboard. On average, replacing the entire panel takes a couple of hours.
Video interactive display on VAZ 2114:


